Easy Teacher Appreciation Gift
THIS POST MAY CONTAIN AFFILIATE LINKS. READ MY FULL DISCLOSURE FOR MORE INFO
The end of the school year is fast approaching! To show our kids’ teachers how thankful we are for all their time, devotion, love, and hardwork educating and shaping their small minds, we like to shower them with a little TLC. The gift doesn’t have to be expensive; it’s your choice how much or how little you spend. The main point is that you, and your kids, are giving back a little of the love that has been given!
Here is one easy idea that will spread a little kindness and “light” to your favorite teachers.
*Note: We understand there are many different tools and materials that could be used in this project but we are keeping it simple for the beginner. Please feel free to add as little or as much as your creative heart desires!
What you will need:
Candle
Cricut or other cutting machine and tools (see below for details).
Permanent Vinyl-We prefer Siser, but also like Oracle 651, and Cricut.
Transfer paper
Alcohol to prep candle surface before transfer
Let’s Get Started!
Step 1: DESIGN IT
So what message do you want to send to your child’s teacher? Something funny like, “Thanks for putting out all the fires this year!”, or maybe something sentimental, like “Thanks for lighting the way!”. Today we are going to demonstrate using the phrase “Smells Like Summer Break” since this is an end of the year gift and our scent it Sugar Palm.
To design our logo, we will be using Cricut design space. This is a free program to design, upload images, insert text, etc. You will need to set up an account (which is free), but it will save all of your projects and you will be able to access them at any time for future use.
Once you’ve set up your account, click on New Project in the top right corner.
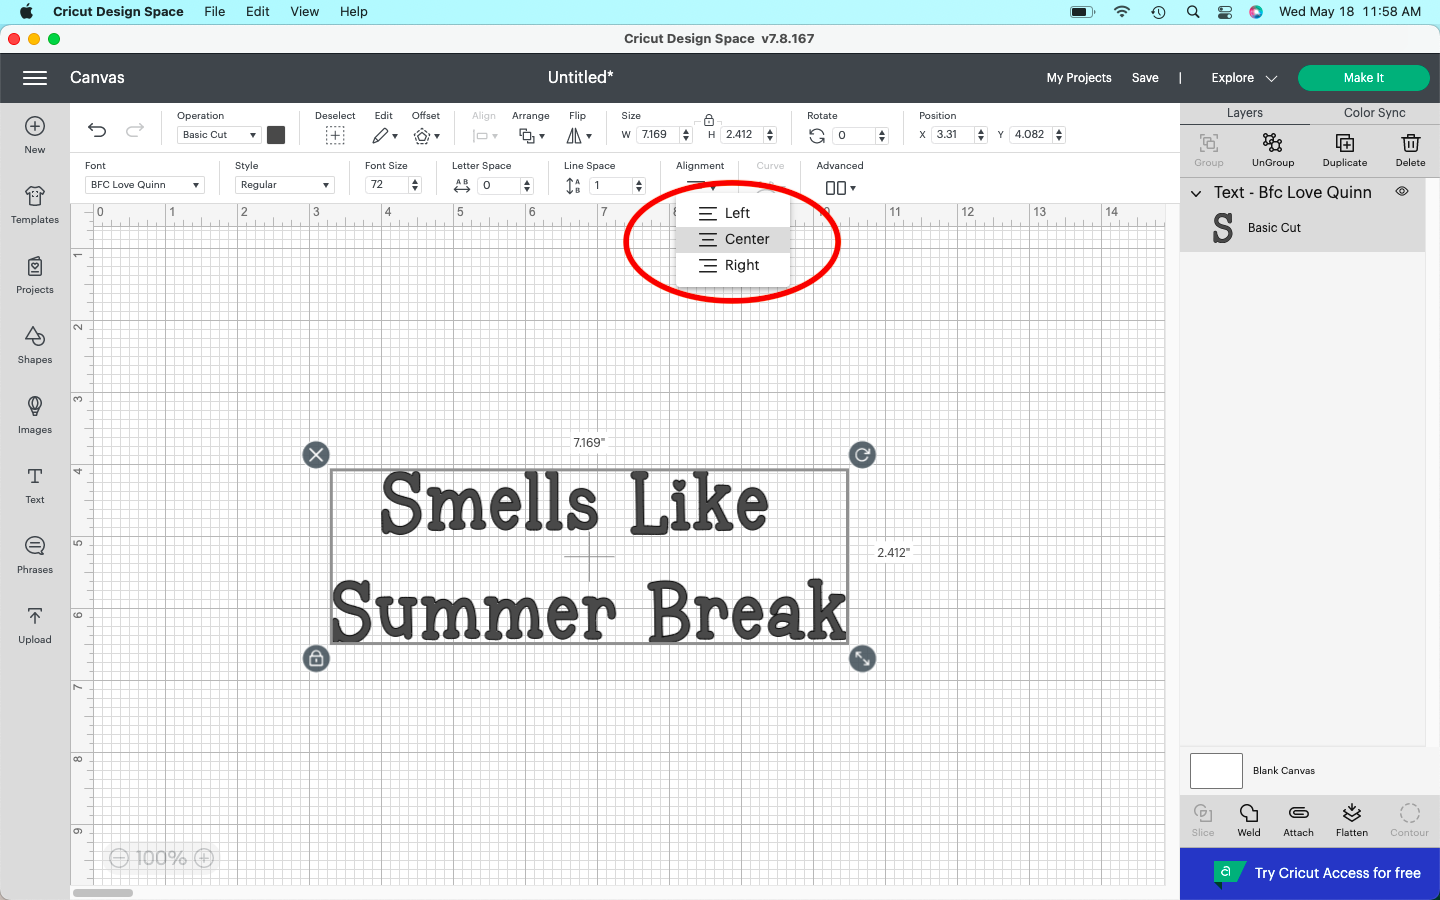
Next, click on the text icon on left hand side (see red number 1 on image).
Then, choose your font by clicking on the drop down box (see red number 2 in image). For those new to design space, certain text fonts and images are free while others you will have to pay for if used. We chose a free font named BFC Love Quinn.
Type your message in the text box. We wanted to to make two lines instead of one, so we placed the cursor between the words “like” and “summer” and hit enter.
In order to center the words, we clicked the drop down box on alignment and hit center.
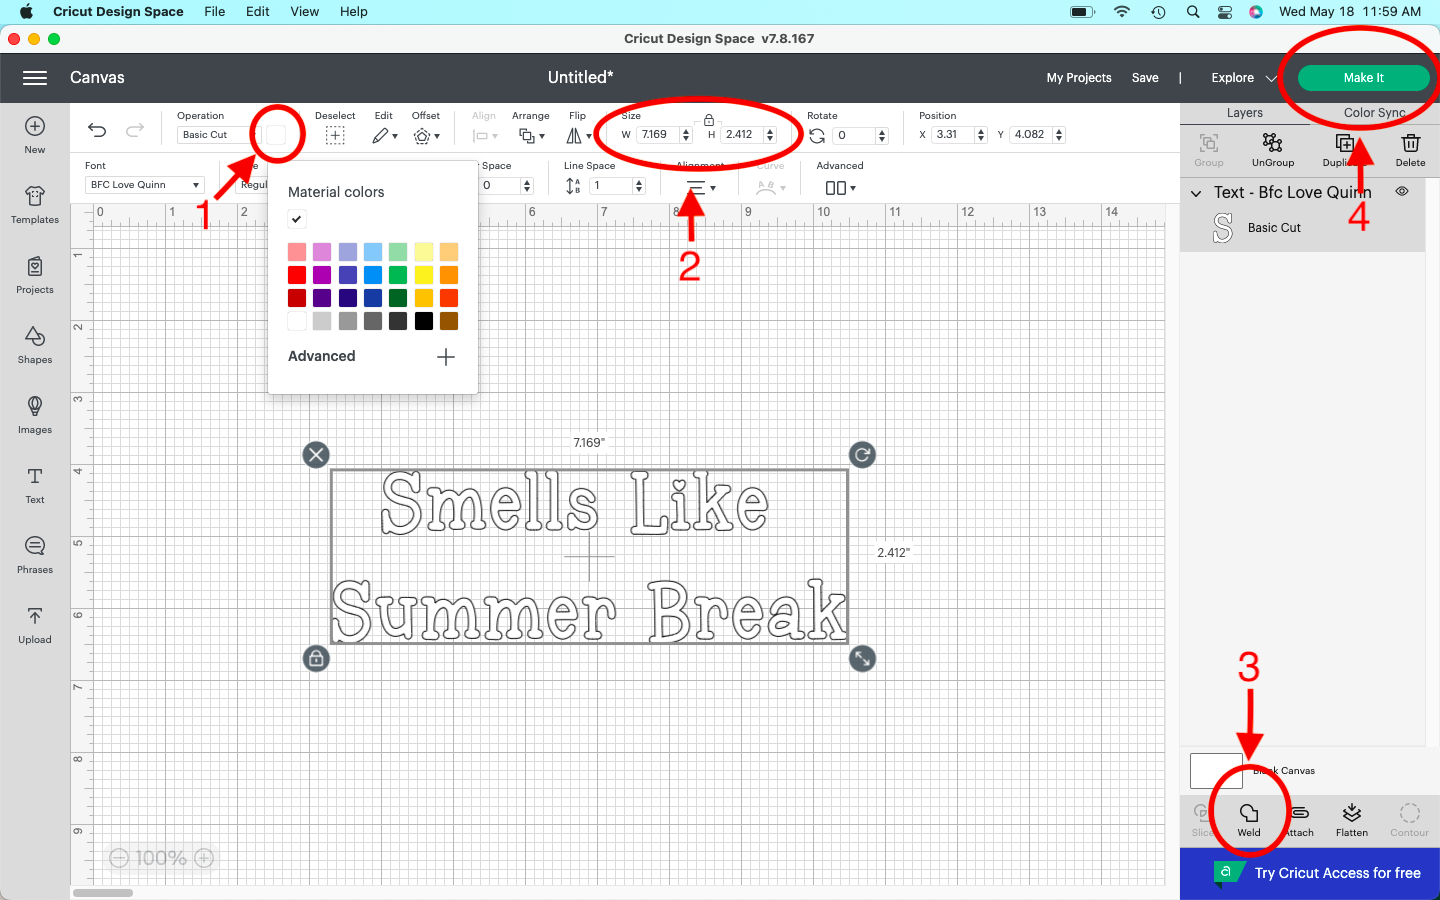
If you want to change the font color, go to the color drop down box and click (see number 1 in image). It isn’t necessary to change the color because the Cricut will cut whatever vinyl you pick regardless of color on the screen, but for planning purposes or images with more than one color, it is very helpful!
Next we needed to resize the font in order to fit the candle we are placing the words on. We measured our candle and decided we wanted it to be 3in. long and 1.5in tall. To do this, go to the width and height drop down (see number 2 in image). In order to type in the exact height and width, click on the lock to “unlock” it. Next change the numbers to the desired amount and then click the lock again to “lock” it into place.
Finally we chose to weld our words so when we cut them they all cut together in order (see number 3 in image). BE CAREFUL because once the words are welded they cannot be unwelded and you will have to start over to make changes.
Once you have changed the color of font, changed the size, and welded, make sure you SAVE your project for future use. Now, you are ready to create and Make It (see number 4 in image).
Step 2: MAKE IT
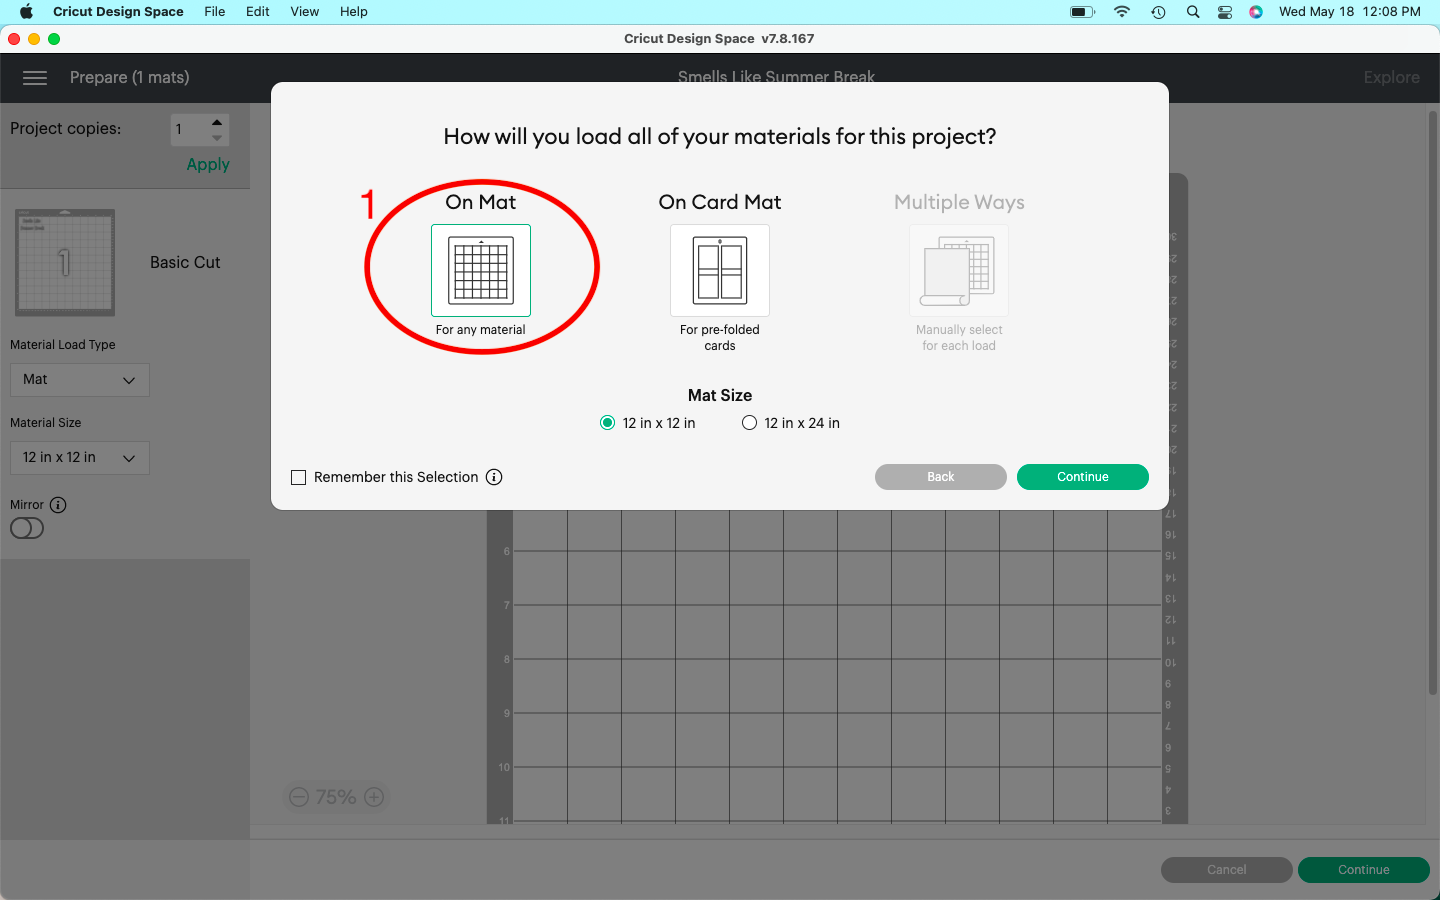
Once you have designed your message, it’s time to make it! We used the Cricut Explorer 2 cutting machine to cut our image. After clicking the MAKE IT button seen above, follow these steps:
Select the type of mat you will be using for your project. For this project you will be using a Standard Grip mat (ours is green) that is 12”x12” and selected the “On Mat” option (see number 1 in below image). Hit continue when you’ve selected your mat choice.
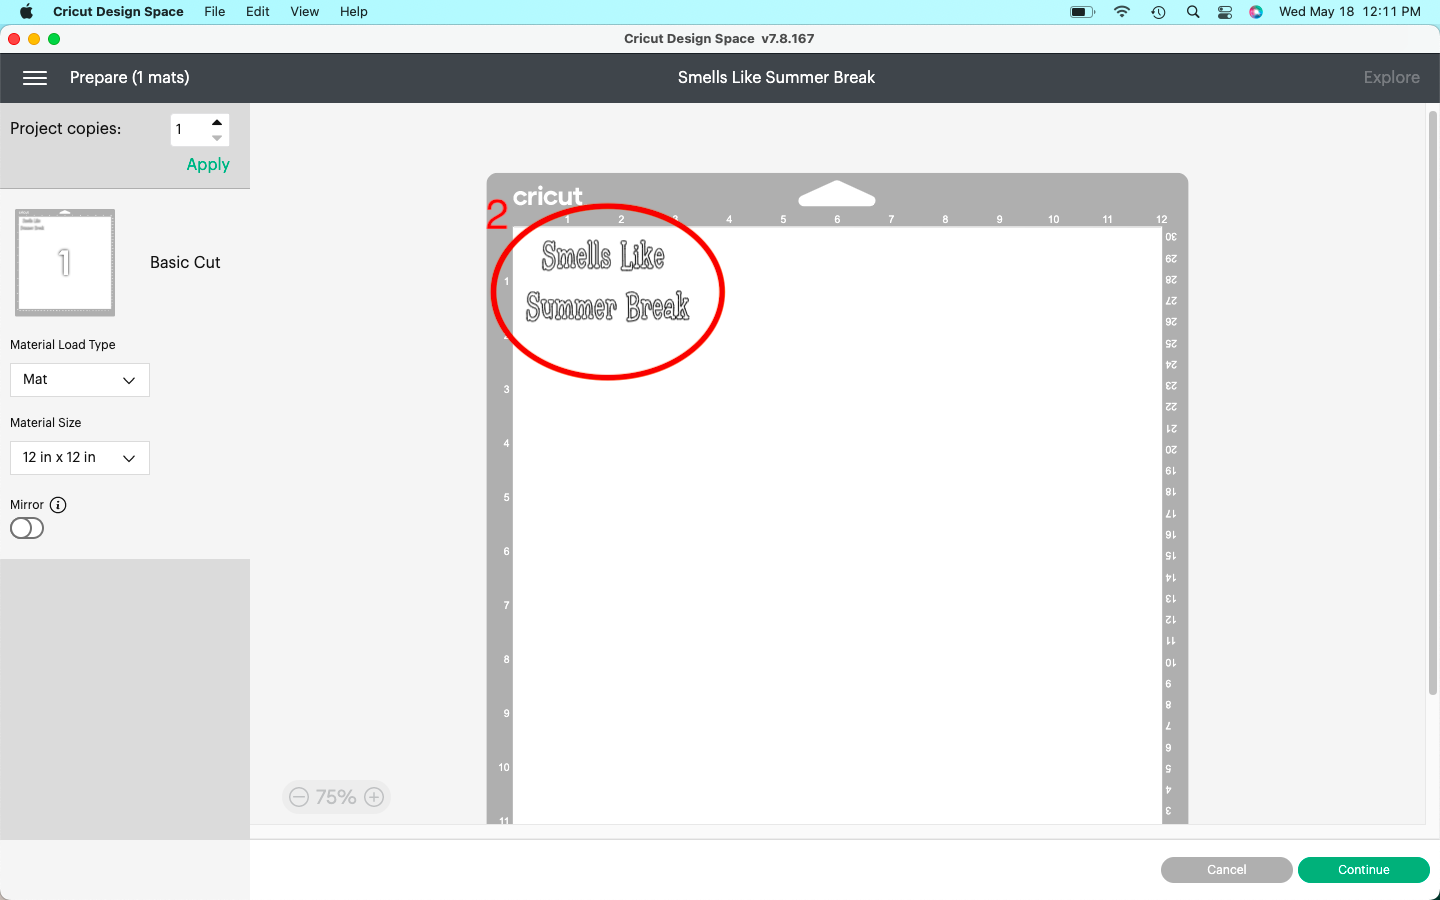
Align your text where you want it to be on the cutting mat (see number 2 in below image). This is where you will place your vinyl on the mat for cutting with the cricut. *Note, you DO NOT hit the mirror button for this project since you are using permanent vinyl. Hit continue once complete with this step.
3. Plug in your Cricut, turn it on (see number 1 in picture). Turn the knob on the Cricut to “Vinyl” (see number 2 in picture) and the arrow should begin flashing indicating it is ready to load the mat (see number 3 in picture).
4. Line the vinyl (we used white permanent vinyl- Oracle 651) on the standard grip mat as you have it in step 2 on the screen.
5. Double check your settings and feed the mat into the Cricut by lining it up and pressing the flashing arrow (as seen above).
6. Press the “C” button and watch the magic begin!
7. When it is finished the arrow button will flash once again and you will press that to unload the mat.
Step 3: WEED IT
Once your image is cut, flip the mat over and remove the mat from the vinyl. This will keep your vinyl from curling up. Cut the excess vinyl off around your words and now you’re ready to weed!
Use your scraper (we like this one) to rub to back of the vinyl to provide better adhesion.
Start in one corner and slowly remove the vinyl off the backing using your weeding tools (we like these), leaving only the words. Be careful that the letters don’t lift off. You may have to hold letters down as you peel.
Use the weeding tools to remove the insides of the letters and everything you don’t want to show on the candle.
Step 4: TRANSFER WORDS TO THE CANDLE
Now it’s time to make the final product!
Cut a piece of transfer tape a little bit larger than your words. (We used this transfer tape)
Taco your tape to allow a smoother application and avoiding bubbling (see pictures below). Starting with the middle of your words, place the center of your “taco” and slowly apply the tape covering the words. Use the scraper to rub over the front and the back to smooth it out and to provide better adhesion of the words to the tape.
Decide where you want your words on the candle and clean the candle surface where you are applying the words with alcohol to remove any debris, oils or dirt that could interfere with adhesion.
4. Slowly remove the transfer tape starting at one corner from the backing and the words will now be on the tape.
5.After the alcohol has dried completely, repeat the “taco” process with the tape and apply the words slowly beginning with the taco center and gradually apply from center to outer edges. Use the scraper or your finger to smooth out the tape and press around each letter to make certain it has adhered. Lastly, carefully peel the transfer tape off. If letters start to lift, place the tape back down and apply more pressure, then try again.
And now your have your final product! Again, this project is meant to be simple and low cost! Spread a little love to those in your life and remember… In a World full of noise… LET LOVE BE LOUDER!
And here it is!
Now your have your final product! Again, this project is meant to be simple and low cost! Spread a little love to those in your life and remember…
In a World full of noise… LET LOVE BE LOUDER!


